Saturday, 9 May 2015

Sewing Tip 2: Diagonal Basting

Diagonal basting is the best stitch ever for holding pieces exactly where you want them, prior to machine stitching them together. Unlike using a running basting stitch, or pins, diagonally basted pieces will not shift, since a ladder of stitches is created that holds in all directions. It is also quick, and uniquely satisfying. Here's what to do:

Fig. 1 Keep the needle pointing to the left
  • Assuming you are right-handed (sorry lefties), hold the needle horizontally, with the sharp end pointing left. Keep the needle in this position the whole time. (Fig. 1)
  • Fig. 2 All-over diagonal basting - nothing's going to move

  • Begin work on the lower left side of the area to be basted. If covering a large area, work up to the top, move one stitch over to the right, then down to the bottom, over to the right, up to the top, etc. (Fig. 2)
  • Do not knot the thread. It is easier to remove basting thread that is un-knotted, and ensures the fabric will lie flat, and not be inadvertently distorted by too-tight basting. Doing the first two stitches close together will prevent the thread from pulling out as you begin to work.
  • Take a (roughly) 1cm-long horizontal stitch through the layers to be basted, right to left. Move the needle about an inch above the previous stitch (or below, depending if you are travelling up or down) and repeat.

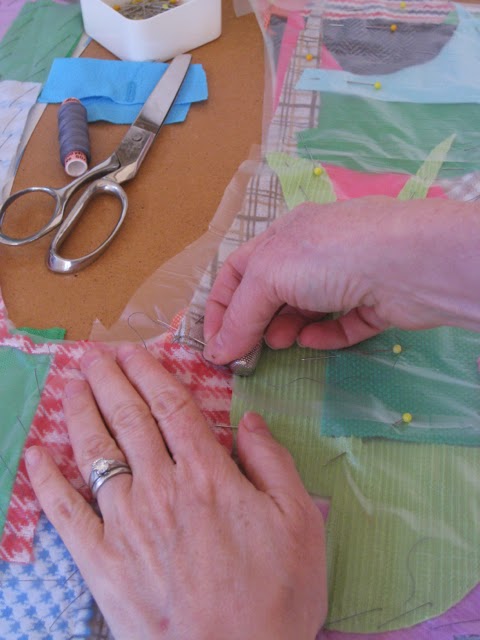
    Fig. 3 To prevent tangling, let the thread glide under the fingertip
  • For easiest hand stitching, use cotton, threaded onto the needle with the grain - as it came off the spool. Minimize further tangling by placing the pointer finger of the left hand gently on the thread as it travels through the hole in the garment. (Fig. 3)
  • The front of the work will resemble parallel diagonal lines or chevrons. The back of the work will show only small, horizontal parallel lines.
  • This stitch, done closer together, is used in tailoring to pad collars and lapels. It is excellent for preventing t-shirt hems from twisting when hemming with a twin needle. I use it every time I sew or drape. Nothing else works as well to prevent shifting.

Sewing Tip 1: Thread Has Grain!


Most people do as little hand sewing as possible, thinking it is not fun, or it's hard. I can't help with the fun part (though I do enjoy it, myself, in moderation), but there is a simple fact that, if understood, makes it so much easier.

All sewing is all about the grain. Thread has grain. When hand-sewing, the direction the thread is sewn should be the same as it came off the spool. Some folks recommend immediately knotting the thread at the cut end, even before threading the needle, just to be sure to get the direction right. Ignoring the grain results in thread that will knot easily, making hand sewing seem much harder than it needs to be. And not fun.

If you want to use a double strand, do not simply put one strand on the needle and knot the two ends of it together. The difference in the grains will make the threads fight with each other, and it will be a tangly bugger to sew with. Instead, cut two strands, lay them together in the same direction, thread them both through the same needle (tricky, but can be done), knot them together at the end, and sew away.

Speaking of hand sewing, I have read many places that the only proper way to do it is to wax the thread beforehand. I asked Blossom about this, since I've never seen her wax her thread, and she replied that thread these days is strong enough without waxing. Followed by that little "tsk" she sometimes does. So there it is. Couture sewing might be considered by some to be synonymous with doing everything the hard way, but not harder than necessary. I suspect those articles are written by folk who secretly don't wax their thread, either, even if they do sew with the grain.
Monday, 4 May 2015

Humatrope 1: Ingredients

Wasteful packaging - each needle has two caps!
Tonight is the night I've been waiting for: after four months spent gathering materials, I will finally begin the fun part of my Prader-Willi Syndrome sewing project.* Tonight I begin to play. This is going to be so much fun!
*Never heard of Prader-Willi Syndrome? Neither had I

The materials are the waste from my daughter's nightly Humatrope* injections - white, felt-like alcohol swabs and lovely lavender or aqua syringe caps, one per day. I did my usual thing for those four months: I sewed, and volunteered for Our Social Fabric. Some of the debris from these activities was saved, too: all the snipped-off thread tails from the sewing room garbage can and all the plastic pearls found in the dust pan at OSF. I'm curious to see what all this garbage turns out to be.
*There are no medications that work to curb the never-ending feeling of hunger that is the hallmark of PWS, however Human Growth Hormone can greatly improve the quality of life. Born with naturally flabby, flaccid bodies, HGH turns fat cells into muscle, lethargic kids into healthier, stronger, more active ones. As a byproduct, more calories are burned, and the child - whose calorie intake is severely restricted by a bizarrely slow metabolism - can eat more food. Almost like a typical kid


For a rough idea of how many would be needed, the swabs were pinned to the mannequin as they became available.
The diamond pattern is not quite doing it for me...
The plan is vague: some kind of quilted, layered collar, possibly beaded. A temporary foundation of plastic-like Heat-Away Solvy will provide structure until the thing can stand on its own. The Solvy will eventually be removed by heating. Though it is easier to manage the sturdier sort of stabilizer that rinses out when wet, I don't want to out, out any damn'd spots by accident.

I've been so eager to get to the construction, the accompanying article is already finished. I hope to post updates as the project goes along - which I hope is steadily - though that's doubtful, free time being at a minimum.

The next step: deciding the best way to assemble it, which will, in turn, affect the design. I'll need to make a swatch, to test if what I'm hoping to do will work. The plan is to use a darning foot to machine-embroider the swabs and threads with Words of Love and Admiration that will hold them all together. One anticipated challenge: the Solvy is delicate and crumbly and will probably tear under the herky-jerky motions of the darning foot. In that case, freehand embroidery won't work and I'll have to go with classic diamond quilting. Straight lines shouldn't be too tricky.

The "ink" for writing the words of love
Thread colour? Don't know. Understated white? Classy, but not really me. More likely, whatever colour there happens to be in any bobbin that no longer has its matching spool of thread. I'm constantly looking for excuses to empty bobbins...

How it will fasten is unknown. I had planned to use a real Chanel button found by my son on the floor of the electronics section at a Costco, but he told me recently it's disgusting to put that beautiful button on something made out of bloody alcohol pads. He wants me to save it, instead, for a companion piece inspired by 25 Cogmed sessions and the Dubble Bubble* that got him through it. He's right, of course... Never mind; plenty of time to give thought to the closure while I'm testing the sewing technique.
*Did you know there are 20 calories in one piece of Dubble Bubble?

If I had a tail, I'd be wagging it. Tomorrow I sew!